[ad_1]
这在 Linux 或类 Unix 系统中,每个用户和进程都在特定环境中运行。 环境包括变量、设置、别名、函数等。 以下是对一些有用的 shell 环境命令的简要介绍,包括如何使用每个命令和设置环境以提高命令提示符下的工作效率的示例。
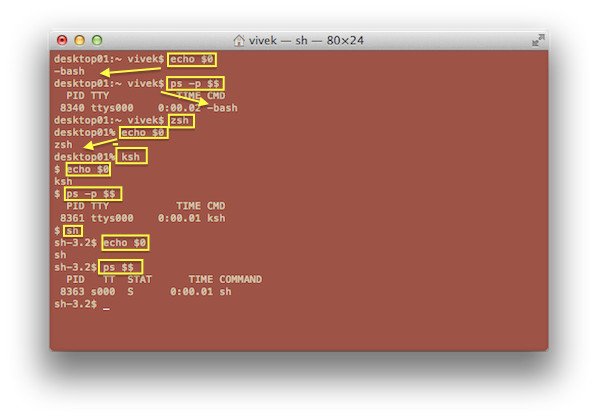
找出你当前的 shell
在终端应用程序中键入以下任一命令:
ps $$
ps -p $$
或者
echo "$0"
示例输出:
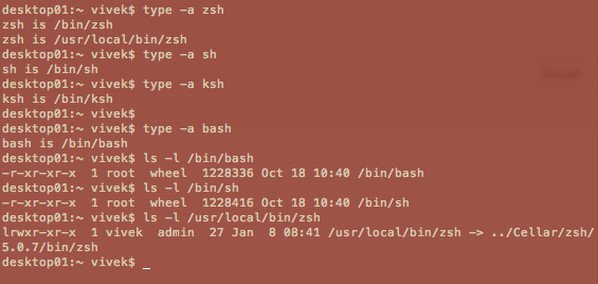
找出已安装的 shell
要找出已安装 shell 类型的完整路径:
type -a zsh
type -a ksh
type -a sh
type -a bash
示例输出:
/etc/shells 文件包含系统上的 shell 列表。 对于每个 shell,应该存在一行,由 shell 相对于 root 的路径组成。 键入以下 cat 命令以查看 shell 数据库:
cat /etc/shells
示例输出:
# List of acceptable shells for chpass(1).
# Ftpd will not allow users to connect who are not using
# one of these shells.

/bin/bash
/bin/csh
/bin/ksh
/bin/sh
/bin/tcsh
/bin/zsh
/usr/local/bin/fish
临时更改当前的 shell
只需键入外壳名称。 在这个例子中,我从 bash 到 zsh:
zsh
您只是暂时将您的 shell 更改为 zsh。 也称为子壳。 要退出子外壳/临时外壳,请键入以下命令或按 CTRL-d:
exit
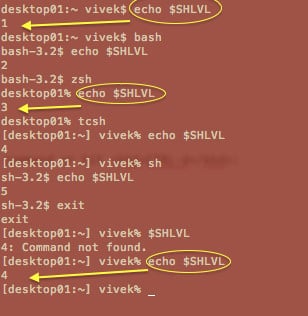
找出子shell级别/临时shell嵌套级别
$SHLVL 每次增加一个实例 bash 已启动。 键入以下命令:
echo "$SHLVL"
示例输出:
使用 chsh 命令永久更改当前的 shell
想要改变 你自己的外壳 从 bash 永久zsh? 尝试:
chsh -s /bin/zsh
想要 更改其他用户的外壳 从 bash 永久ksh? 尝试:
sudo chsh -s /bin/ksh userNameHere
找出你当前的环境
您需要使用 env 命令查看当前环境或设置执行命令的环境:
env
env | more
env | less
env | grep 'NAME'
示例输出:
TERM_PROGRAM=Apple_Terminal
SHELL=/bin/bash
TERM=xterm-256color
TMPDIR=/var/folders/6x/45252d6j1lqbtyy_xt62h40c0000gn/T/
Apple_PubSub_Socket_Render=/tmp/launch-djaOJg/Render
TERM_PROGRAM_VERSION=326
TERM_SESSION_ID=16F470E3-501C-498E-B315-D70E538DA825
USER=vivek
SSH_AUTH_SOCK=/tmp/launch-uQGJ2h/Listeners
__CF_USER_TEXT_ENCODING=0x1F5:0:0
PATH=/usr/bin:/bin:/usr/sbin:/sbin:/usr/local/bin:/opt/X11/bin:/usr/local/go/bin:/usr/local/sbin/modemZapp:/Users/vivek/google-cloud-sdk/bin
__CHECKFIX1436934=1
PWD=/Users/vivek
SHLVL=2
HOME=/Users/vivek
LOGNAME=vivek
LC_CTYPE=UTF-8
DISPLAY=/tmp/launch-6hNAhh/org.macosforge.xquartz:0
_=/usr/bin/env
OLDPWD=/Users/vivek
下面是常用的表格 bash 外壳变量:
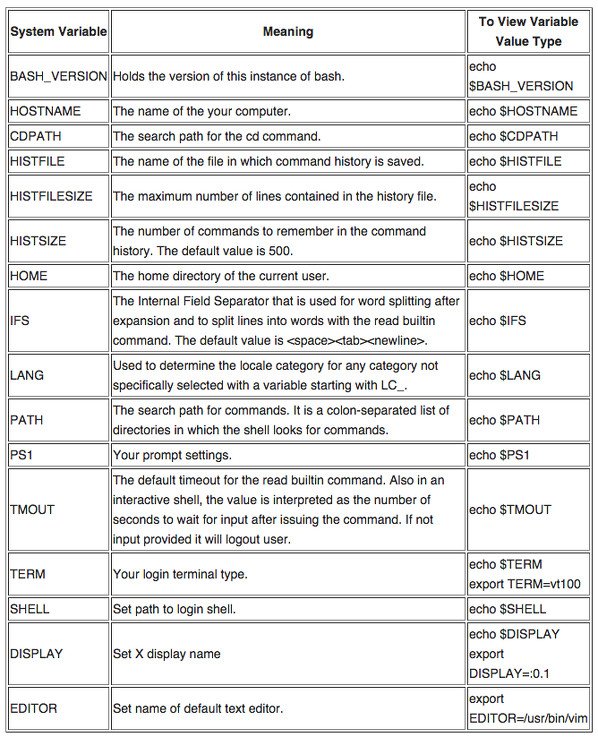
警告: 最好不要更改以下环境变量。 有些可以更改,并可能导致您的会话不稳定:
壳
用户标识符
随机的
残疾人士
PPID
SSH_AUTH_SOCK
用户
家
LINENO
显示环境变量的值
使用以下任一命令显示名为 HOME 的环境变量的值:
## Use printenv ##
printenv HOME

## or use echo ##
echo "$HOME"

# or use printf for portability ##
printf "%sn" "$HOME"
示例输出:
/home/vivek
添加或设置新变量
语法如下 bash 或 zsh 或 sh 或 ksh 外壳:
## The syntax is ##
VAR=value
FOO=bar

## Set the default editor to vim ##
EDITOR=vim
export $EDITOR

## Set default shell timeout for security ##
TMOUT=300
export TMOUT

## You can directly use export command to set the search path for commands ##
export PATH=$PATH:$HOME/bin:/usr/local/bin:/path/to/mycoolapps
同样,使用 printenv 或 echo 或 printf 命令查看名为 PATH、EDITOR 和 TMOUT 的环境变量的值:
printenv PATH
echo "$EDITOR"
printf "%sn" $TMOUT
如何更改现有的环境变量?
语法如下:
export VAR=value
## OR ##
VAR=value
export $VAR

## Change the default editor from vim to emacs ##
echo "$EDITOR" ## <--- print vim
EDITOR=emacs   ## <--- change it
export $EDITOR ## <--- export it for next session too
echo "$EDITOR" ## <--- print emacs
语法如下 用于添加或更改变量的 tcsh shell:
## Syntax
setenv var value
printenv var

## Set foo variable with bar as a value ##
setenv foo bar
echo "$foo"
printenv foo

## Set PATH variable ##
setenv PATH $PATH:$HOME/bin
echo "$PATH"

## set PAGER variable ##
setenv PAGER most
printf "%sn" $PAGER
寻找你的 bash 外壳配置文件
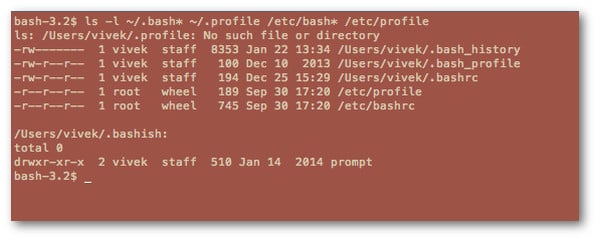
键入以下命令以列出您的 bash shell 文件,输入:
ls -l ~/.bash* ~/.profile /etc/bash* /etc/profile
样本输出:
看看你所有的 bash 配置文件,输入:
less ~/.bash* ~/.profile /etc/bash* /etc/profile
你可以编辑 bash 使用 vim 或 emacs 等文本编辑器一一配置文件:
vim ~/.bashrc
要编辑位于 /etc/ 中的文件,请键入:
## first make a backup.. just in case
sudo cp -v /etc/bashrc /etc/bashrc.bak.22_jan_15

########################################################################
## Alright, edit it to your hearts content and by all means, have fun ##
## with your environment or just increase the productivity :)         ##
########################################################################
sudo vim /etc/bashrc
对 Bash shell 初始化文件感到困惑?
下列 ”bash 文件初始化” 图表将帮助您:
根据默认设置的 shell,您的用户配置文件或系统配置文件可以是以下之一:
查找您的 zsh shell 配置文件
zsh 维基 推荐以下命令:
strings =zsh | grep zshrc
示例输出:
/etc/zshrc
.zshrc
键入以下命令列出您的 zsh shell 文件,输入:
ls -l /etc/zsh/* /etc/profile ~/.z*
要查看所有 zsh 配置文件,请输入:
less /etc/zsh/* /etc/profile ~/.z*
查找您的 ksh shell 配置文件
- 请参阅 ~/.profile 或 /etc/profile 文件。
查找您的 tcsh shell 配置文件
- 有关 C shell,请参阅 ~/.login、~/.cshrc。
- 有关 TC shell,请参阅 ~/.tcshrc 和 ~/.cshrc。
我可以在每次登录时自动执行这样的脚本吗?
是的,将您的命令或别名或其他设置添加到 ~/.bashrc (bash shell) 或 ~/.profile (sh/ksh/bash) 或 ~/.login (csh/tcsh) 文件。
我可以在每次注销时自动执行这样的脚本吗?
是的,将您的命令或别名或其他设置添加到 ~/.bash_logout (bash) 或 ~/.logout (csh/tcsh) 文件。
历史:获取有关您的 shell 会话的更多信息
只需键入 history 命令即可查看会话历史记录:
history
示例输出:
    9  ls
   10  vi advanced-cache.php
   11  cd ..
   12  ls
   13  w
   14  cd ..
   15  ls
   16  pwd
   17  ls
   ....
   ..
   ...
   91  hddtemp /dev/sda
   92  yum install hddtemp
   93  hddtemp /dev/sda
   94  hddtemp /dev/sg0
   95  hddtemp /dev/sg1
   96  smartctl -d ata -A /dev/sda | grep -i temperature
   97  smartctl -d ata -A /dev/sg1 | grep -i temperature
   98  smartctl  -A /dev/sg1 | grep -i temperature
   99  sensors
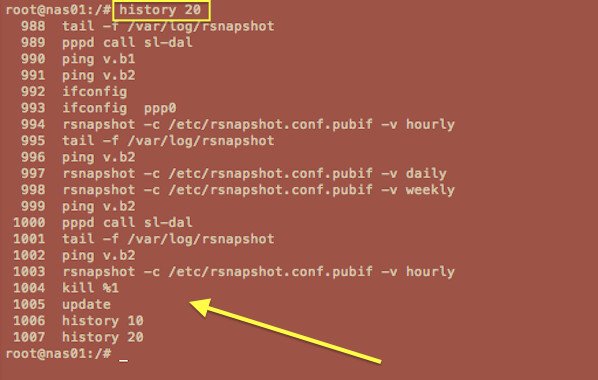
键入 history 20 以查看历史记录中的最后 20 个命令:
history 20
示例输出:
您可以重复使用命令。 简单打
[Up]
和
[Down]
箭头键查看以前的命令。 按
[CTRL-r]
从 shell 提示符向后搜索历史缓冲区或文件以查找命令。 要重复最后一个命令,只需输入 !! 在 shell 提示符下:
ls -l /foo/bar
!!
要从上述历史会话中查看命令 #93 (hddtemp /dev/sda),请键入:
!93
改变你的身份 sudo 或苏
语法如下:
su userName

## To log in as a tom user ##
su tom

## To start a new login shell for tom user ##
su tom

## To login as root user ##
su -

## The sudo command syntax (must be configured on your system) ##
sudo -s
sudo tom
有关更多信息,请参阅“Linux 以其他用户身份运行命令”帖子 sudo, su 和 runuser 命令。
外壳别名
别名只不过是命令的快捷方式。
列出别名
键入以下命令:
alias
示例输出:
alias ..='cd ..'
alias ...='cd ../../../'
alias ....='cd ../../../../'
alias .....='cd ../../../../'
alias .4='cd ../../../../'
alias .5='cd ../../../../..'
alias bc="bc -l"
alias cd..='cd ..'
alias chgrp='chgrp --preserve-root'
alias chmod='chmod --preserve-root'
alias chown='chown --preserve-root'
alias cp='cp -i'
alias dnstop='dnstop -l 5 eth1'
alias egrep='egrep --color=auto'
alias ethtool="ethtool eth1"
创建别名
这 bash/zsh 语法是:
alias c='clear'
alias down='sudo /sbin/shutdown -h now'
为系统命令 clear 输入 c 别名,所以我们可以输入 c 而不是 clear 命令来清除屏幕:
c
或键入关闭基于 Linux 的服务器:
down
您可以创建任意数量的别名。 请参阅“30 Handy Bash Shell Aliases For Linux / Unix / Mac OS X”了解别名在类 Unix 系统上的实际用法。
外壳函数
Bash/ksh/zsh 函数允许您进一步定制您的环境。 在这个例子中,我正在创建一个简单的 bash 调用 memcpu() 的函数来显示前 10 个 CPU 和内存消耗进程:
memcpu() { echo "*** Top 10 cpu eating process ***"; ps auxf | sort -nr -k 3 | head -10;
echo  "*** Top 10 memory eating process ***"; ps auxf | sort -nr -k 4 | head -10;  }
只需键入 memcpu 即可在屏幕上查看信息:
memcpu

*** Top 10 cpu eating process ***
nginx    39559 13.0  0.2 264020 35168 ?        S    04:26   0:00      _ /usr/bin/php-cgi
nginx    39545  6.6  0.1 216484 13088 ?        S    04:25   0:04      _ /usr/bin/php-cgi
nginx    39471  6.2  0.6 273352 81704 ?        S    04:22   0:17      _ /usr/bin/php-cgi
nginx    39544  5.7  0.1 216484 13084 ?        S    04:25   0:03      _ /usr/bin/php-cgi
nginx    39540  5.5  0.1 221260 19296 ?        S    04:25   0:04      _ /usr/bin/php-cgi
nginx    39542  5.4  0.1 216484 13152 ?        S    04:25   0:04      _ /usr/bin/php-cgi
nixcraft 39543  5.3  0.1 216484 14096 ?        S    04:25   0:04      _ /usr/bin/php-cgi
nixcraft 39538  5.2  0.1 221248 18608 ?        S    04:25   0:04      _ /usr/bin/php-cgi
nixcraft 39539  5.0  0.1 216484 16272 ?        S    04:25   0:04      _ /usr/bin/php-cgi
nixcraft 39541  4.8  0.1 216484 14860 ?        S    04:25   0:04      _ /usr/bin/php-cgi

*** Top 10 memory eating process ***
498      63859  0.5  4.0 2429652 488084 ?      Ssl   2014 177:41 memcached -d -p 11211 -u memcached -m 2048 -c 18288 -P /var/run/memcached/memcached.pid -l 10.10.29.68 -L
mysql    64221  4.2  3.4 4653600 419868 ?      Sl    2014 1360:40  _ /usr/libexec/mysqld --basedir=/usr --datadir=/var/lib/mysql --user=mysql --log-error=/var/log/mysqld.log --open-files-limit=65535 --pid-file=/var/run/mysqld/mysqld.pid --socket=/var/lib/mysql/mysql.sock
nixcraft 39418  0.4  1.1 295312 138624 ?       S    04:17   0:02  |   _ /usr/bin/php-cgi
nixcraft 39419  0.5  0.9 290284 113036 ?       S    04:18   0:02  |   _ /usr/bin/php-cgi
nixcraft 39464  0.7  0.8 294356 99200 ?        S    04:20   0:02  |   _ /usr/bin/php-cgi
nixcraft 39469  0.3  0.7 288400 91256 ?        S    04:20   0:01  |   _ /usr/bin/php-cgi
nixcraft 39471  6.2  0.6 273352 81704 ?        S    04:22   0:17      _ /usr/bin/php-cgi
vivek    39261  2.2  0.6 253172 82812 ?        S    04:05   0:28      _ /usr/bin/php-cgi
squid     9995  0.0  0.5 175152 72396 ?        S     2014  27:00  _ (squid) -f /etc/squid/squid.conf
cybercit  3922  0.0  0.4 303380 56304 ?        S    Jan10   0:13  |   _ /usr/bin/php-cgi
看 ”如何编写和使用shell函数“ 想要查询更多的信息。
把它们放在一起:定制你的 Linux 或 Unix bash 外壳工作环境
现在,您已准备好使用 bash 壳。 我只是覆盖 bash. 但是这个理论在 zsh、ksh 和其他常见的 shell 中是一样的。 让我们看看如何采用 shell 来满足我作为系统管理员的需要。 编辑您的 ~/.bashrc 文件并附加设置。 这里有一些对您有用的配置选项。
#1:设置 bash 路径和环境变量
# Set path ##
export PATH=$PATH:/usr/local/bin:/home/vivek/bin:/opt/firefox/bin:/opt/oraapp/bin

# Also set path for cd command
export CDPATH=.:$HOME:/var/www
使用 less 或 most 命令作为寻呼机:
export PAGER=less
将 vim 设置为我们的默认文本编辑器:
export EDITOR=vim
export VISUAL=vim
export SVN_EDITOR="$VISUAL"
设置 Oracle 数据库特定的东西:
export ORACLE_HOME=/usr/lib/oracle/xe/app/oracle/product/10.2.0/server
export ORACLE_SID=XE
export NLS_LANG=$($ORACLE_HOME/bin/nls_lang.sh)
根据 java 版本设置 java 的 JAVA_HOME 和其他路径:
export JAVA_HOME=/usr/lib/jvm/java-6-sun/jre

# Add ORACLE, JAVA to PATH
export PATH=$PATH:$ORACLE_HOME/bin:$JAVA_HOME/bin
使用钥匙串保护我的远程 SSH 登录以实现无密码登录:
# No need to input password again ever
/usr/bin/keychain $HOME/.ssh/id_rsa
source $HOME/.keychain/$HOSTNAME-sh
最后,开启 bash 命令完成
source /etc/bash_completion
#2:设置 bash 命令提示符
设置自定义 bash 提示(PS1):
PS1='{[email protected]:w }$ '
#3:设置默认文件权限
## Set default to 644 ##
umask 022
#4: 控制你的 shell 历史设置
# Dont put duplicate lines in the history
HISTCONTROL=ignoreboth

# Ignore these commands
HISTIGNORE="reboot:shutdown *:ls:pwd:exit:mount:man *:history"

# Set history length via HISTSIZE and HISTFILESIZE
export HISTSIZE=10000
export HISTFILESIZE=10000

# Add timestamp to history file.
export HISTTIMEFORMAT="%F %T "

#Append to history, don't overwrite
shopt -s histappend
#5:设置会话的时区
## set to IST for my own session ##
TZ=Asia/Kolkata
#6:设置shell行编辑界面
## use a vi-style line editing interface for bash from default emacs mode ##
set -o vi
#7:设置你最喜欢的别名
## add protection ##
alias rm='rm -i'
alias cp='cp -i'
alias mv='mv -i'

## Memcached ##
alias mcdstats='/usr/bin/memcached-tool 10.10.29.68:11211 stats'
alias mcdshow='/usr/bin/memcached-tool 10.10.29.68:11211 display'
alias mcdflush='echo "flush_all" | nc 10.10.29.68 11211'

## Default command options ##
alias vi='vim'
alias grep='grep --color=auto'
alias egrep='egrep --color=auto'
alias fgrep='fgrep --color=auto'
alias bc='bc -l'
alias wget='wget -c'
alias chown='chown --preserve-root'
alias chmod='chmod --preserve-root'
alias chgrp='chgrp --preserve-root'
alias rm='rm -I --preserve-root'
alias ln='ln -i'
这里有一些额外的 OS X Unix bash 外壳别名:
# Open desktop apps from bash
alias preview="open -a '$PREVIEW'"
alias safari="open -a safari"
alias firefox="open -a firefox"
alias chrome="open -a google chrome"
alias f='open -a Finder '

# Get rid of those .DS_Store files
alias dsclean='find . -type f -name .DS_Store -delete'
#8:为我的世界着色
# Get colored grep output
alias grep='grep --color=auto'
export GREP_COLOR='1;33'

# colored ls too
export LSCOLORS='Gxfxcxdxdxegedabagacad'
# Gnu/linux ls
ls='ls --color=auto'

# BSD/os x ls command
# alias ls="ls -G"
#9:设置你的最爱 bash 职能
# Show top 10 history command on screen
function ht {
  history | awk '{a[$2]++}END{for(i in a){print a[i] " " i}}' | sort -rn | head
}

# Wrapper for host and ping command
# Accept https:// or https:// or ftps:// names for domain and hostnames
_getdomainnameonly(){
	local h="$1"
	local f="${h,,}"
	# remove protocol part of hostname
        f="${f#https://}"
        f="${f#https://}"
	f="${f#ftp://}"
	f="${f#scp://}"
	f="${f#scp://}"
	f="${f#sftp://}"
	# remove username and/or username:password part of hostname
	f="${f#*:*@}"
	f="${f#*@}"
	# remove all /foo/xyz.html*
	f=${f%%/*}
	# show domain name only
	echo "$f"
}


ping(){
	local array=( $@ )  		# get all args in an array
	local len=${#array[@]}          # find the length of an array
	local host=${array[$len-1]}     # get the last arg
	local args=${array[@]:0:$len-1} # get all args before the last arg in [email protected] in an array
	local _ping="/bin/ping"
	local c=$(_getdomainnameonly "$host")
	[ "$t" != "$c" ] && echo "Sending ICMP ECHO_REQUEST to "$c"..."
	# pass args and host
	$_ping $args $c
}

host(){
	local array=( $@ )
	local len=${#array[@]}
	local host=${array[$len-1]}
	local args=${array[@]:0:$len-1}
	local _host="/usr/bin/host"
	local c=$(_getdomainnameonly "$host")
	[ "$t" != "$c" ] && echo "Performing DNS lookups for "$c"..."
  	$_host $args $c
}
#10:配置 bash 通过 shell shopt options 命令的 shell 行为
最后,你可以 更改您的 bash 使用 set 和 shopt 的 shell 环境 命令:
# Correct dir spellings
shopt -q -s cdspell

# Make sure display get updated when terminal window get resized
shopt -q -s checkwinsize

# Turn on the extended pattern matching features
shopt -q -s extglob

# Append rather than overwrite history on exit
shopt -s histappend

# Make multi-line commandsline in history
shopt -q -s cmdhist

# Get immediate notification of background job termination
set -o notify

# Disable [CTRL-D] which is used to exit the shell
set -o ignoreeof
结论
这篇文章绝不是全面的。 它提供了有关如何自定义环境的简短演练。 全面了解 bash/ksh/zsh/csh/tcsh 功能,我建议您通过键入以下命令阅读手册页:
man bash
man zsh
man tcsh
man ksh
[ad_2]